Credit goes to Excaliber
So lets get started. The First skills you need are as follows, please note this guide will be a pvp guide because warlock is a pvp class however if you should choose to do a pve warlock, dont get the skills with the * next to them. It indicates that those skills are pvp.
oh btw your stat build from lvl 1-50 should be 3 int 1 vit
1. lvl 5 dark message first and best skill you need.
2. lvl 3 cold wave is useful, you can max it if you want but you wont need more than lvl 3 later because later you'll use before you cast ability drain because drain has a 4 second cast time.
3. dark eyes is a skill you have to get in the skill tree but its still useful keep it on at all times.
4. lvl 5 health coil very good for pve and still does decent dmg in pvp
5. lvl 3 or 4 mana coil lvl 4 is not required but its still nice to have because it increases mana coil's dmg which is good for pvp.
6. lvl 5 int beam it will be your BEST single target dmg skill and is very important
7. lvl 5 wide encourage your first aoe its what mages are made for!
8. lvl 1 taming mind (coma, useful in pvp when your skills are recharging or if you need to hit a mob for mana or health or something) OR lvl 1 strong mind (debuff shield). You MUST have one of them to gain access to frozen ice.
*9. lvl 1-5 frozen ice only lvl 1 is really required but its a useful skill so you may want to 5 it but considering you'll be working on your skill build till 9xish it may not be what you want to spend you skill points on at low lvls.
*10. your next needed skill in the first set, lvl 5 dispel magic. Your debuff and one of your most important skills great for pissing off dekans and making your enemy far weaker.
11. Portal warp is good for if you plan to be doing alot of rahkon 2 or 3 parties. you will need it only lvl 2 because you can use fake death to get the argo off you and then cast it. I personally didnt get this till I reset at 65. NOTE: it has come to my attention that lvl 4 portal warp is useful if your party gets attacked by a venge party so I'd advise lvl 4ing it if you do ANY pvp whatsoever.
*12. lvl 1 broken barrier great for pvp it will take a healers protection off the guy you're trying to kill (because healers have a shitton of psy at high lvls it can be VERY difficult to break and its good to be spending the time actually killing the healer and not the shield) can also be used against magic mirror, and dragon sage "guard" which is like an int shield
*13. cure silence. If you dont have this some dhan is gonna put you outa business VERY quickly. Lvl 7 silence is a pain in the ass and you MUST get it off you because we are nothing without our skills.
and this concludes your first set of skills congrats. Please note you want to get your skill build done by 3x lvl 35ish is best to have it done by a bit of leeway one way or the other is fine.
14. Energy sphere. In my second making of a warlock, I've found energy sphere to be quite useful and therefore Worth getting if you can squeeze it in while still maxing your most important skills as you get them. I would advise maxing energy sphere and then if you plan to be pvping a bunch taking the 5 points out of it and putting them into magic mirror or break ability or area toxic potion or something.... but it just depends on your personal play style. You will want to get tis skill by 8x or so if you can afford a magical attack staff as energy sphere does very well with a magical attack staff at high lvls
lvl 50 CONGRATS you're a warlock! please see my pg 4 post for the link to a page helpful about the quests. Anyway you're going to be less of a glass cannon from now on so lets get started.
stat build 5 int 1 vit OR 4 int 2 vit I personally went for 4 int 2 vit but its entirely up to your personal preference. I would advise even if you want to go 5 int 1vit to go 4 int 2 vit till 60 so u can tank a bit more of dmg incase the healer is taking a dump or something. "why 60?" you might as me, because at lvl 60 you get a skill that resets the agro and makes u invincible for 5 secs which means you can cast your aoes and then use it (its called fake death BTW) and watch the tanks actually do their job and tank.
okay skill build.
1. lvl 5 int shield this makes u less of a total glass cannon.
2. *EDIT* lvl 0 staff mastery, you will hardly have enough skill points at 99 anyway so you cant be wasting your points on things you dont need.
3. lvl 1 impenetrable shield another one of those skills you have to get anyway, but its still good. Chain it with break ability to be impossible to stun :P .
4. lvl 1 push, lvl 1 to lvl 5 doesnt have that much a difference in dmg and you have other skills that need the sp. however you may want to max it after you've maxed the other skills I will advise you to get.
5. lvl 5 pollution mind. Great aoe dmg over time (DOT) also good for pvp. a good skill to chain with fake death later.
6. lvl 1 root you may want to lvl 5 it later because its your only actual stun. even if its only 6 seconds its still your only stun........ and its an AOE so thats also cool plus its cooldown is far less than any other stun, only 25 seconds ;)
7. lvl 1 fake death theres no difference besides the cooldown on lvl 1 vs lvl 5
Well starting 6x you'll be doing some more pvp so these are now the mainly pvp skills.....oh right the actual skill; okay since you may have a few sp left over if you chose to follow this guide to the letter there are a few skills you need to work on while still having 5 sp by lvl 62 to max broken treasure. MAKE SURE IF YOU'RE GOING TO PVP THAT YOU SAVE 5 POINTS FOR BROKEN TREASURE!!!
*9. lvl 1 ability drain (assuming you have a free sp) okay this is good to lvl 5 and use after you cold wave the target. it is like doing 800 dmg to your enemy and making him about 10% less effective for some time. lvl 1 it now if u have the free sp and make sure you lvl 5 it later!
*10. lvl 1 magic mirror another skill you need to max when u get the sp. Please note!!!!! it does not work as described! all it does is reflect 2 attacks at lvl 5 BUT if you use it correctly you can reflect their stuns and sway the battle further in your favor.
*11. lvl 1 and then 5 break ability this skill disables your enemy's paralyzes ie dhan skil death call, knight skill rush...etc. lvl 1 it first and then lvl 5 it as you get the spare sp
*12. lvl 1 area toxic potion. Great to chain with broken treasure because toxic potion is undetoxable and broken treasure is detoxable. Broken treasure is your best skill and it sucks if it gets detoxed. Anyway.... get area toxic to lvl 5 as soon as you have the sp because it also takes away one of their hp pots which can give u the extra seconds you may need to kill.
other skills optional skills are.....
1. Skill erase at lvl 65. Please note if ANY of your skills are lvl 6 do not use this. IT can however be useful if you got a skill or two to a lvl you didnt want them or if you want a skill you want but have the skill points in a skill you like less you can use this to reset it. INSTRUCTIONS: put 1 point into it reset first set of skills. Then put another point into it (making it lvl 2) and reset second tier (it also resets the erase skill so you get your sp back ;). *2. disable pet (it can be helpful when dealing with lvl 3 pets)
*3. snatch which is nice just for fun basically but can also be used to piss off someone who wont give you buffs =).
Finally "best skills to lvl 6 or more"
1. INT shield is VERY good to lvl 6
2. Broken treasure, increases effect time by 4 seconds and decreases it's cooldown time to 2 mins
3. lvl drop (when it gets fixed it will make us much better in pvp)
4. Dark message, more mp and hp are always useful
5. Break ability
6. Magic mirror
7. Area toxic potion
8. Ability drain
9. Attack skills, Pollution mind and int beams are good ones to start out with.
There you go, ;) if you do use your skillstones from your skillstone quests (1 lvl 40 solo and lvl 50 from outside of carolinas tomb) make sure you try them WITH the GUILD BUFF because they are not 100%
Lvling spots... this is a good topic for that...
viewtopic.php?f=11&t=40391
lvl 22-27ish akma cave ursas and elder ursas.
lvl 27-32 bloodsouls! these are the fun times
32-35ish mightsouls at ahkma
35-37 leatherheads (you'll need a party)
38. You may want to spend this whole lvl doing specter money quests which can be found at the orc fortress (go to gathering hall and get an orc fortress portal stone from the sundries merchant) the quests are called "blood red key" and "incurable curse" and give 20k each P.S. a bunny is great for this quest.
37-41 mummies also at ahkma
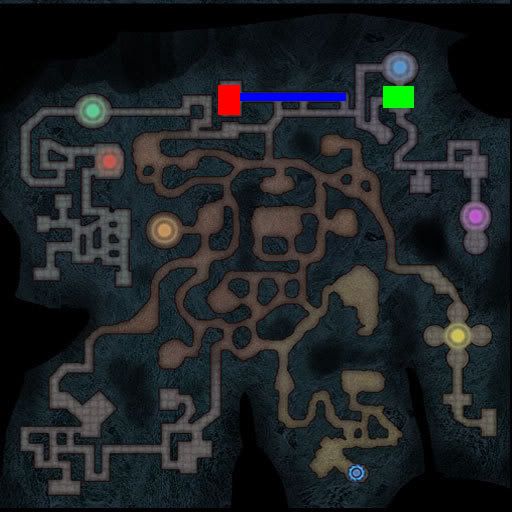
41-45 entrance of rahkon 1 coded in blue on the map below.
46-50 rahkon 1 sofa room the green colored spot.
50-60 alter of roha you can get there using a portal stone from the gathering hall called "pine plateau"
61-70 spire of redemption same map as alter but different portal stone from the gathering hall sundries merch called limestone portal stone.
71-8x rahkon 3 salimanders and stuff lol.
8x uhhh something just kinda depends on where the scrolls are fire temple would be a good spot tho.
90-99 rahkon 5 also various spots
DO ALL QUESTS MARKED SOLO!!!!!!! also late 5x is when it becomes pointed to do quests so start doing them.
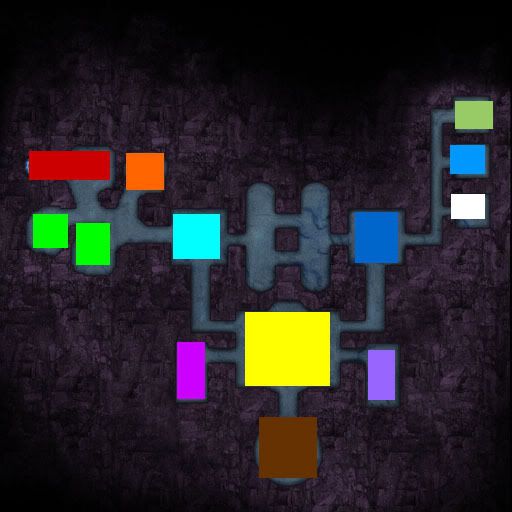
Map of rahkon 1 the green and blue areas please see above for their explanation. The red area is the entrance.
Next is ahkma cave. it is color coded as follows.
1. Red, entrance contains Ursas and warrior ursas
2. Light green, contains warrior ursas
3. Orange, Contains elder ursas and "Berg" boss
4. Teal, Contains Bloodsouls commonly known as "Bloodsoul Room"
5. Yellow, Contains mightsouls and dark souls commonly known as "mightsouls room" also contains Boss "Nightmare Kan" (its one of those kans I think its the nightmare one)
6. Pink, contains Soul bringers (and a melee mob soul something) and boss "Mollek"
7. Contains deranged mummies, deranged shamans, and boss "Bloody Tyrant"
8. Purple, contains Soul bringers and the same melee mob from mollek room. Also contains "Soul Guardian" boss mob.
9. Blue, contains specters and shamanistic specters and also contains boss mob I'm not 100% sure what kind but "Kan"
10. White, contains leatherheads.
11. Light Blue, contains head collecters and "Ruin Kan"
12. Olive, contains mummies
Armors/weps. Okay being a glass cannon and all we need good armors but if this is your first char or you're not cash shop whored (spending real money to get stuff from cash shop) its going to be difficult so just try and get the armors as near as you can to the lvls I state. Keep in mind that I had previous characters so I had a pool of cash to draw from making me have armor and weapons before most others.
Armors
3-15 benezar and great for these lvls seeing as its a armor with a 99% forge success rate and does decently in these lvls because they will be flying by so fast it will be pointless to spend too much money on amazing weps and armor at this lvl.
15-35 E froianne with +25-35 damage reflection per part is VERY useful in these levels. +150 damage every time a mob hits you is amazing. Be advised, if the damage reflection kills a mob it wont count on your mkil count. Also, if you dont have + 20 pdef froianne or cant get mental barrier from a templar or almighty from a priest or protection from a knight or some sort of pdef boost during the lvls you're fighting bloodsouls and mightsouls they're gonna be hitting about 60-75s on you which is far too much to grind efficiently. If you get one of those +40 pdef item mall robes for like 150 rps it'll do the trick tho. After that robe or buffs or 20 pdef froianne bloods should be hitting you for about 40-55 or so which with maxed health coil and pots and a bit of leech on your wep should easily allow you to pull 5-7 bloodsouls and kill them without really being much of an annoyance. If you cant afford to get the maxed pdef fro or cant find someone to buff you or cant get the IM robe, you can also use +15-20 pdef graham instead which will get the job done but no 150 damage every time you get hit which means slower leveling.
35-45 natu if you can get it. Chances are if this is your first char you wont be able to unless you buy crones with rps, but if it is aim for 40 and dont settle for anything less than 43. +25 pdef perfered if not +30 or 35 but 20 pdef is acceptable.
45-58 pluion if you can get it you can probly get it by lvl 50 even if this is your first char. +40ish pdef is nice but +50 pdef is perfered
58-68 enchanted pluion try to get 1or2 mp enchants and the rest hp if you can. +50 pdef or +60
68-78 edwin if you can get it +50 pdef ka'el is also useful. +80 pdef on the edwin atleast! +90 or +100 is perfered
78-8x enchanted edwin +90 or 100 pdef
8x-9x bedron. +100 or more pdef
Weapons
1-10 lvl 1x staff the rare one (green background). stats not necessary
10-20 lvl 2x staff, the rare one stats not necessary
lvl 20-30 lvl 3x staff the rare one OR lvl 2x unique staff (yellow background) +whatever int you can get
lvl 30-35 lvl 3x staff, the rare one +whatever int you can get
lvl 36-50 lvl 41 unique staff, you can ancient (blue background) it if you want but its not reccomended because they have high fail rates. +30 int +10 vit perfered
lvl 50-60 lvl 61 unique staff around now you need to start using incense burners of marea for the dmg drop % if you can afford it. If not, teardrops of edoneh for leech will work in pve but will be lacking in pvp. +50 or more int perfered
61-70 you can either keep the 61 uniq or make it anchient either one will do. I personally kept my unique and chose to make and dlvl my lvl 81 staff sooner.
70-75 lvl 81 unique +75ish int +15 or so vit.... the more the better tho.
75ish-late 8x try to make a +100 int +20 or so vit staff. lvl 82 ancient. Try to get it as godly as possible.
90-99 lvl 101 uniq and lvl 102 ancient. Try to get as much int as you can possibly cram into it, I havent made one but I'm assuming its about 150 max
try to get as much vit on it as you can as well, but dont sac int for vit
Read more
So lets get started. The First skills you need are as follows, please note this guide will be a pvp guide because warlock is a pvp class however if you should choose to do a pve warlock, dont get the skills with the * next to them. It indicates that those skills are pvp.
oh btw your stat build from lvl 1-50 should be 3 int 1 vit
1. lvl 5 dark message first and best skill you need.
2. lvl 3 cold wave is useful, you can max it if you want but you wont need more than lvl 3 later because later you'll use before you cast ability drain because drain has a 4 second cast time.
3. dark eyes is a skill you have to get in the skill tree but its still useful keep it on at all times.
4. lvl 5 health coil very good for pve and still does decent dmg in pvp
5. lvl 3 or 4 mana coil lvl 4 is not required but its still nice to have because it increases mana coil's dmg which is good for pvp.
6. lvl 5 int beam it will be your BEST single target dmg skill and is very important
7. lvl 5 wide encourage your first aoe its what mages are made for!
8. lvl 1 taming mind (coma, useful in pvp when your skills are recharging or if you need to hit a mob for mana or health or something) OR lvl 1 strong mind (debuff shield). You MUST have one of them to gain access to frozen ice.
*9. lvl 1-5 frozen ice only lvl 1 is really required but its a useful skill so you may want to 5 it but considering you'll be working on your skill build till 9xish it may not be what you want to spend you skill points on at low lvls.
*10. your next needed skill in the first set, lvl 5 dispel magic. Your debuff and one of your most important skills great for pissing off dekans and making your enemy far weaker.
11. Portal warp is good for if you plan to be doing alot of rahkon 2 or 3 parties. you will need it only lvl 2 because you can use fake death to get the argo off you and then cast it. I personally didnt get this till I reset at 65. NOTE: it has come to my attention that lvl 4 portal warp is useful if your party gets attacked by a venge party so I'd advise lvl 4ing it if you do ANY pvp whatsoever.
*12. lvl 1 broken barrier great for pvp it will take a healers protection off the guy you're trying to kill (because healers have a shitton of psy at high lvls it can be VERY difficult to break and its good to be spending the time actually killing the healer and not the shield) can also be used against magic mirror, and dragon sage "guard" which is like an int shield
*13. cure silence. If you dont have this some dhan is gonna put you outa business VERY quickly. Lvl 7 silence is a pain in the ass and you MUST get it off you because we are nothing without our skills.
and this concludes your first set of skills congrats. Please note you want to get your skill build done by 3x lvl 35ish is best to have it done by a bit of leeway one way or the other is fine.
14. Energy sphere. In my second making of a warlock, I've found energy sphere to be quite useful and therefore Worth getting if you can squeeze it in while still maxing your most important skills as you get them. I would advise maxing energy sphere and then if you plan to be pvping a bunch taking the 5 points out of it and putting them into magic mirror or break ability or area toxic potion or something.... but it just depends on your personal play style. You will want to get tis skill by 8x or so if you can afford a magical attack staff as energy sphere does very well with a magical attack staff at high lvls
lvl 50 CONGRATS you're a warlock! please see my pg 4 post for the link to a page helpful about the quests. Anyway you're going to be less of a glass cannon from now on so lets get started.
stat build 5 int 1 vit OR 4 int 2 vit I personally went for 4 int 2 vit but its entirely up to your personal preference. I would advise even if you want to go 5 int 1vit to go 4 int 2 vit till 60 so u can tank a bit more of dmg incase the healer is taking a dump or something. "why 60?" you might as me, because at lvl 60 you get a skill that resets the agro and makes u invincible for 5 secs which means you can cast your aoes and then use it (its called fake death BTW) and watch the tanks actually do their job and tank.
okay skill build.
1. lvl 5 int shield this makes u less of a total glass cannon.
2. *EDIT* lvl 0 staff mastery, you will hardly have enough skill points at 99 anyway so you cant be wasting your points on things you dont need.
3. lvl 1 impenetrable shield another one of those skills you have to get anyway, but its still good. Chain it with break ability to be impossible to stun :P .
4. lvl 1 push, lvl 1 to lvl 5 doesnt have that much a difference in dmg and you have other skills that need the sp. however you may want to max it after you've maxed the other skills I will advise you to get.
5. lvl 5 pollution mind. Great aoe dmg over time (DOT) also good for pvp. a good skill to chain with fake death later.
6. lvl 1 root you may want to lvl 5 it later because its your only actual stun. even if its only 6 seconds its still your only stun........ and its an AOE so thats also cool plus its cooldown is far less than any other stun, only 25 seconds ;)
7. lvl 1 fake death theres no difference besides the cooldown on lvl 1 vs lvl 5
Well starting 6x you'll be doing some more pvp so these are now the mainly pvp skills.....oh right the actual skill; okay since you may have a few sp left over if you chose to follow this guide to the letter there are a few skills you need to work on while still having 5 sp by lvl 62 to max broken treasure. MAKE SURE IF YOU'RE GOING TO PVP THAT YOU SAVE 5 POINTS FOR BROKEN TREASURE!!!
*9. lvl 1 ability drain (assuming you have a free sp) okay this is good to lvl 5 and use after you cold wave the target. it is like doing 800 dmg to your enemy and making him about 10% less effective for some time. lvl 1 it now if u have the free sp and make sure you lvl 5 it later!
*10. lvl 1 magic mirror another skill you need to max when u get the sp. Please note!!!!! it does not work as described! all it does is reflect 2 attacks at lvl 5 BUT if you use it correctly you can reflect their stuns and sway the battle further in your favor.
*11. lvl 1 and then 5 break ability this skill disables your enemy's paralyzes ie dhan skil death call, knight skill rush...etc. lvl 1 it first and then lvl 5 it as you get the spare sp
*12. lvl 1 area toxic potion. Great to chain with broken treasure because toxic potion is undetoxable and broken treasure is detoxable. Broken treasure is your best skill and it sucks if it gets detoxed. Anyway.... get area toxic to lvl 5 as soon as you have the sp because it also takes away one of their hp pots which can give u the extra seconds you may need to kill.
other skills optional skills are.....
1. Skill erase at lvl 65. Please note if ANY of your skills are lvl 6 do not use this. IT can however be useful if you got a skill or two to a lvl you didnt want them or if you want a skill you want but have the skill points in a skill you like less you can use this to reset it. INSTRUCTIONS: put 1 point into it reset first set of skills. Then put another point into it (making it lvl 2) and reset second tier (it also resets the erase skill so you get your sp back ;). *2. disable pet (it can be helpful when dealing with lvl 3 pets)
*3. snatch which is nice just for fun basically but can also be used to piss off someone who wont give you buffs =).
Finally "best skills to lvl 6 or more"
1. INT shield is VERY good to lvl 6
2. Broken treasure, increases effect time by 4 seconds and decreases it's cooldown time to 2 mins
3. lvl drop (when it gets fixed it will make us much better in pvp)
4. Dark message, more mp and hp are always useful
5. Break ability
6. Magic mirror
7. Area toxic potion
8. Ability drain
9. Attack skills, Pollution mind and int beams are good ones to start out with.
There you go, ;) if you do use your skillstones from your skillstone quests (1 lvl 40 solo and lvl 50 from outside of carolinas tomb) make sure you try them WITH the GUILD BUFF because they are not 100%
Lvling spots... this is a good topic for that...
viewtopic.php?f=11&t=40391
lvl 22-27ish akma cave ursas and elder ursas.
lvl 27-32 bloodsouls! these are the fun times
32-35ish mightsouls at ahkma
35-37 leatherheads (you'll need a party)
38. You may want to spend this whole lvl doing specter money quests which can be found at the orc fortress (go to gathering hall and get an orc fortress portal stone from the sundries merchant) the quests are called "blood red key" and "incurable curse" and give 20k each P.S. a bunny is great for this quest.
37-41 mummies also at ahkma
41-45 entrance of rahkon 1 coded in blue on the map below.
46-50 rahkon 1 sofa room the green colored spot.
50-60 alter of roha you can get there using a portal stone from the gathering hall called "pine plateau"
61-70 spire of redemption same map as alter but different portal stone from the gathering hall sundries merch called limestone portal stone.
71-8x rahkon 3 salimanders and stuff lol.
8x uhhh something just kinda depends on where the scrolls are fire temple would be a good spot tho.
90-99 rahkon 5 also various spots
DO ALL QUESTS MARKED SOLO!!!!!!! also late 5x is when it becomes pointed to do quests so start doing them.
Map of rahkon 1 the green and blue areas please see above for their explanation. The red area is the entrance.
Next is ahkma cave. it is color coded as follows.
1. Red, entrance contains Ursas and warrior ursas
2. Light green, contains warrior ursas
3. Orange, Contains elder ursas and "Berg" boss
4. Teal, Contains Bloodsouls commonly known as "Bloodsoul Room"
5. Yellow, Contains mightsouls and dark souls commonly known as "mightsouls room" also contains Boss "Nightmare Kan" (its one of those kans I think its the nightmare one)
6. Pink, contains Soul bringers (and a melee mob soul something) and boss "Mollek"
7. Contains deranged mummies, deranged shamans, and boss "Bloody Tyrant"
8. Purple, contains Soul bringers and the same melee mob from mollek room. Also contains "Soul Guardian" boss mob.
9. Blue, contains specters and shamanistic specters and also contains boss mob I'm not 100% sure what kind but "Kan"
10. White, contains leatherheads.
11. Light Blue, contains head collecters and "Ruin Kan"
12. Olive, contains mummies
Armors/weps. Okay being a glass cannon and all we need good armors but if this is your first char or you're not cash shop whored (spending real money to get stuff from cash shop) its going to be difficult so just try and get the armors as near as you can to the lvls I state. Keep in mind that I had previous characters so I had a pool of cash to draw from making me have armor and weapons before most others.
Armors
3-15 benezar and great for these lvls seeing as its a armor with a 99% forge success rate and does decently in these lvls because they will be flying by so fast it will be pointless to spend too much money on amazing weps and armor at this lvl.
15-35 E froianne with +25-35 damage reflection per part is VERY useful in these levels. +150 damage every time a mob hits you is amazing. Be advised, if the damage reflection kills a mob it wont count on your mkil count. Also, if you dont have + 20 pdef froianne or cant get mental barrier from a templar or almighty from a priest or protection from a knight or some sort of pdef boost during the lvls you're fighting bloodsouls and mightsouls they're gonna be hitting about 60-75s on you which is far too much to grind efficiently. If you get one of those +40 pdef item mall robes for like 150 rps it'll do the trick tho. After that robe or buffs or 20 pdef froianne bloods should be hitting you for about 40-55 or so which with maxed health coil and pots and a bit of leech on your wep should easily allow you to pull 5-7 bloodsouls and kill them without really being much of an annoyance. If you cant afford to get the maxed pdef fro or cant find someone to buff you or cant get the IM robe, you can also use +15-20 pdef graham instead which will get the job done but no 150 damage every time you get hit which means slower leveling.
35-45 natu if you can get it. Chances are if this is your first char you wont be able to unless you buy crones with rps, but if it is aim for 40 and dont settle for anything less than 43. +25 pdef perfered if not +30 or 35 but 20 pdef is acceptable.
45-58 pluion if you can get it you can probly get it by lvl 50 even if this is your first char. +40ish pdef is nice but +50 pdef is perfered
58-68 enchanted pluion try to get 1or2 mp enchants and the rest hp if you can. +50 pdef or +60
68-78 edwin if you can get it +50 pdef ka'el is also useful. +80 pdef on the edwin atleast! +90 or +100 is perfered
78-8x enchanted edwin +90 or 100 pdef
8x-9x bedron. +100 or more pdef
Weapons
1-10 lvl 1x staff the rare one (green background). stats not necessary
10-20 lvl 2x staff, the rare one stats not necessary
lvl 20-30 lvl 3x staff the rare one OR lvl 2x unique staff (yellow background) +whatever int you can get
lvl 30-35 lvl 3x staff, the rare one +whatever int you can get
lvl 36-50 lvl 41 unique staff, you can ancient (blue background) it if you want but its not reccomended because they have high fail rates. +30 int +10 vit perfered
lvl 50-60 lvl 61 unique staff around now you need to start using incense burners of marea for the dmg drop % if you can afford it. If not, teardrops of edoneh for leech will work in pve but will be lacking in pvp. +50 or more int perfered
61-70 you can either keep the 61 uniq or make it anchient either one will do. I personally kept my unique and chose to make and dlvl my lvl 81 staff sooner.
70-75 lvl 81 unique +75ish int +15 or so vit.... the more the better tho.
75ish-late 8x try to make a +100 int +20 or so vit staff. lvl 82 ancient. Try to get it as godly as possible.
90-99 lvl 101 uniq and lvl 102 ancient. Try to get as much int as you can possibly cram into it, I havent made one but I'm assuming its about 150 max
try to get as much vit on it as you can as well, but dont sac int for vit